

💡 At a glance
Contacts and groups help you organize your signature processes easily. In sproof Sign you can create contacts manually or import and export them as a CSV file. As a Plan Admin you can additionally add plan contacts that are available to your entire team.
📑 Step-by-step guide
1. The contacts list in sproof Sign
Contacts are distinguished between personal contacts and plan contacts. Your personal contacts are those you add or upload yourself and only you can see. Plan contacts, on the other hand, are managed by the Plan Admin and are visible to all plan members. They cannot be edited or deleted by plan members.
-
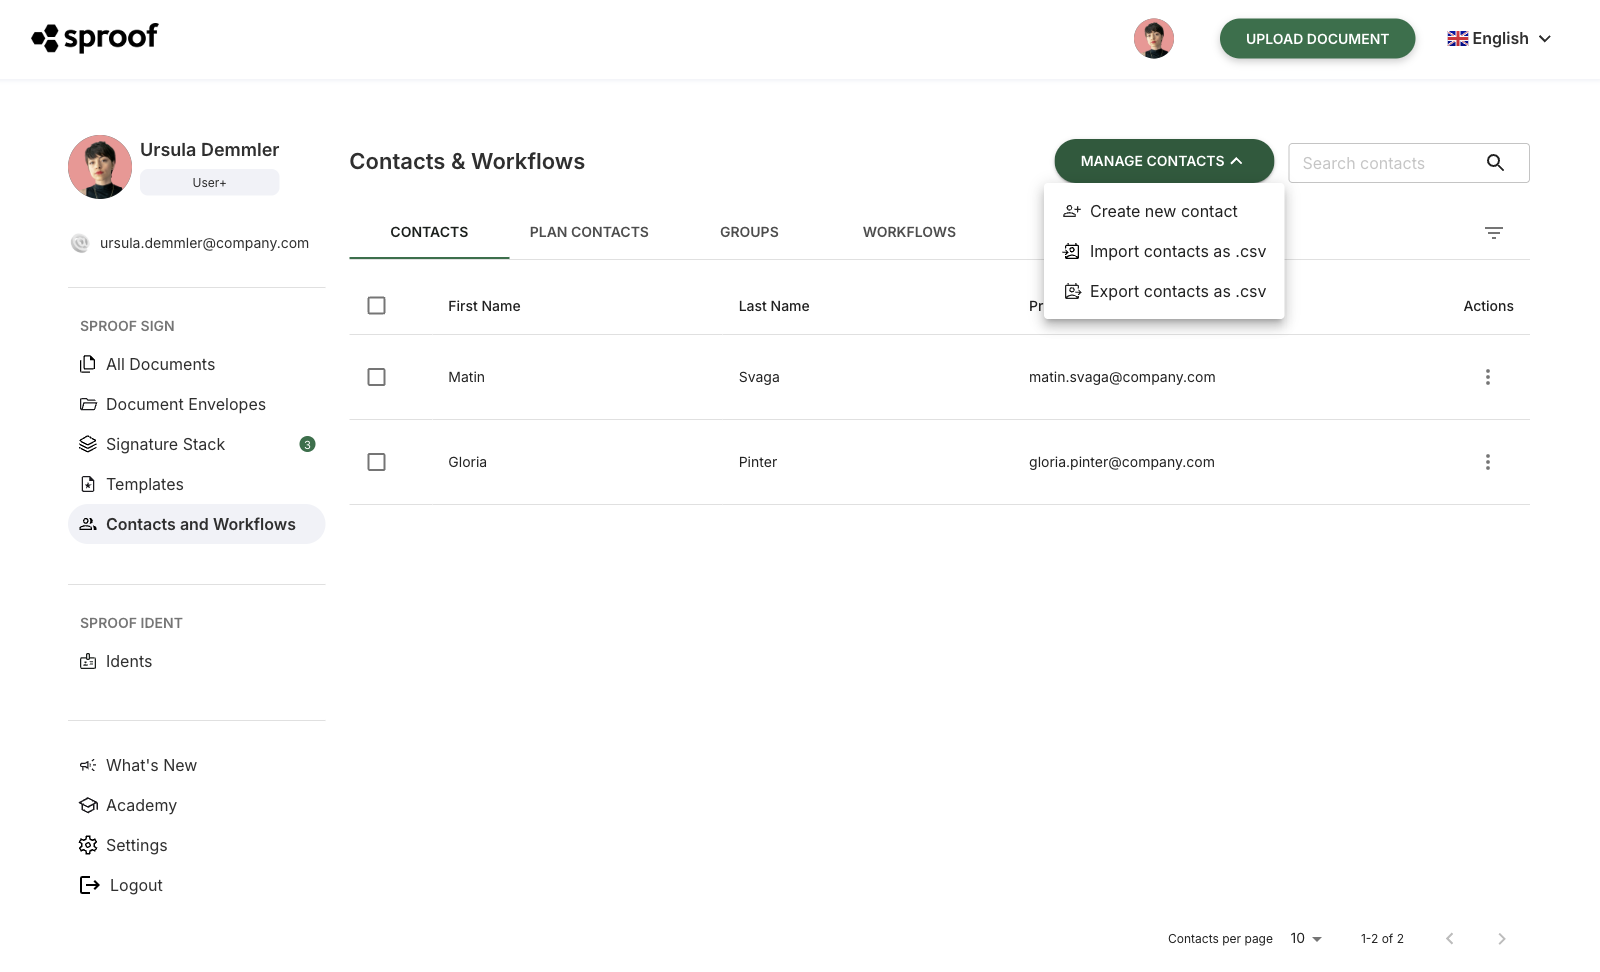
To get to the contacts, click the entry "Contacts and Workflows" on the left in the sidebar.
-
There you will see several tabs: "Contacts", "Groups" and "Workflows". Plan Admins additionally have a fourth tab "Plan Contacts". As a plan member you see your personal contacts as well as plan contacts in a combined list under the "Contacts" tab. Plan contacts are marked with a person icon. Plan contacts can only be edited or deleted by admins.
-
Click the filter icon to the right of the tabs to show or hide additional columns (e.g., creation date, company, address, ...) in the contact list.
-
In the search field at the top right you can search for existing contacts.
-
Click the "Manage contacts" button to the left of the search field to create a new contact, import a contact list, or export your contacts. These functions are described in more detail below.
2. Managing contacts
Create contacts:
-
Under "Manage contacts" → choose "Create new contact".
-
In the dialog window enter first name, last name and primary email (required fields).
-
Optionally add further data under "Additional contact information".
-
Save with "Create contact". The new contact will appear in the list.
Importing contacts:
A quick way to create all your contacts in sproof Sign at once is the import as a CSV file. To do this select the option "Import contacts as CSV" under "Manage contacts". Your file browser will open and you can now select and upload a prepared CSV file. You can create a CSV file, for example, with Microsoft Excel or Google Spreadsheets.
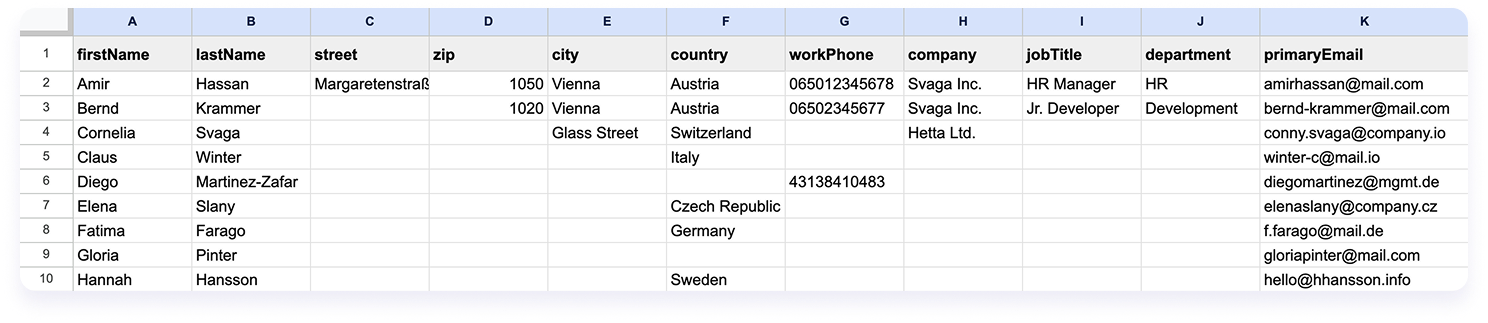
It is important that the columns in your table have the same names as those in the sproof database so the system recognizes and maps them correctly. Use the following column names for your CSV table:
-
firstName
-
lastName
-
street
-
zip
-
city
-
country
-
workPhone
-
company
-
jobTitle
-
department
-
primaryEmail
The columns "firstName", "lastName" and "primaryEmail" must be filled in (these are required fields). The remaining columns are optional. In the following example you can see a sample CSV table.
Exporting contacts
You can either download a complete list of all contacts or select individual contacts you want to download:
-
To download a complete list of all contacts, choose the option "Export contacts as CSV" under "Manage contacts". Your contact list will be downloaded as a CSV file and saved locally on your device.
-
To download individual contacts, select them in the contact list by checking the checkbox
-
Then click the "Download" button on the right.
3. Creating and managing groups
With groups you can significantly speed up signature processes in your company. We have revised the group feature to make it even more flexible for you.
Important information in advance: Enable "Show team members in search" (under License & Team > Plan members) so that sproof Sign can distinguish internal from external groups.

1. Creating groups – How it works:
Click "Create group". You can now choose between two different group types:
-
Plan members only: This group consists exclusively of members of your plan. The advantage: with these groups you can share workflows and other information.
-
External allowed: Here you can add both plan members and external persons (e.g., customers or partners). In the search you can immediately see by the note next to the name who is external.
Note: Groups that contain externals cannot share internal assets (such as workflows or groups).
Once you have made your selection and added the members, click "Create group". In your overview you will then see immediately which group type it is.
2. Sharing groups
Previously you could either share groups with the entire plan or not at all. From now on you have full control:
You can now specifically share groups with individual people or certain internal teams. Please note that sharing groups is only possible within your plan (internally).
And here’s how:
-
In the group's detail view click the share icon.
-
A window opens: here you can either use the slider to share the group with the entire plan or select individual people and groups via the search field.
-
Confirm with "Share group".
How do I recognize shared groups? A green share icon next to the group name immediately shows you that this group has been shared with others. Want to change the settings? Simply click the icon again, either directly next to the name or in the detail view.
3. Send a document to a group
There is the option to send a document directly to the entire group. To do this click "Send document to group" in the group details.