

💡 At a Glance
With workflows you can save all settings used when collecting signatures and approvals to reuse them later. You can store not only individual documents but also entire document folders or even placeholders for future documents in a workflow. You can save, create, update, share workflows with the team, and much more.
📑 Step-by-Step Guide
1. What is a workflow in sproof Sign?
With workflows you can save valuable time by storing all settings used when collecting signatures and approvals to reuse them later.
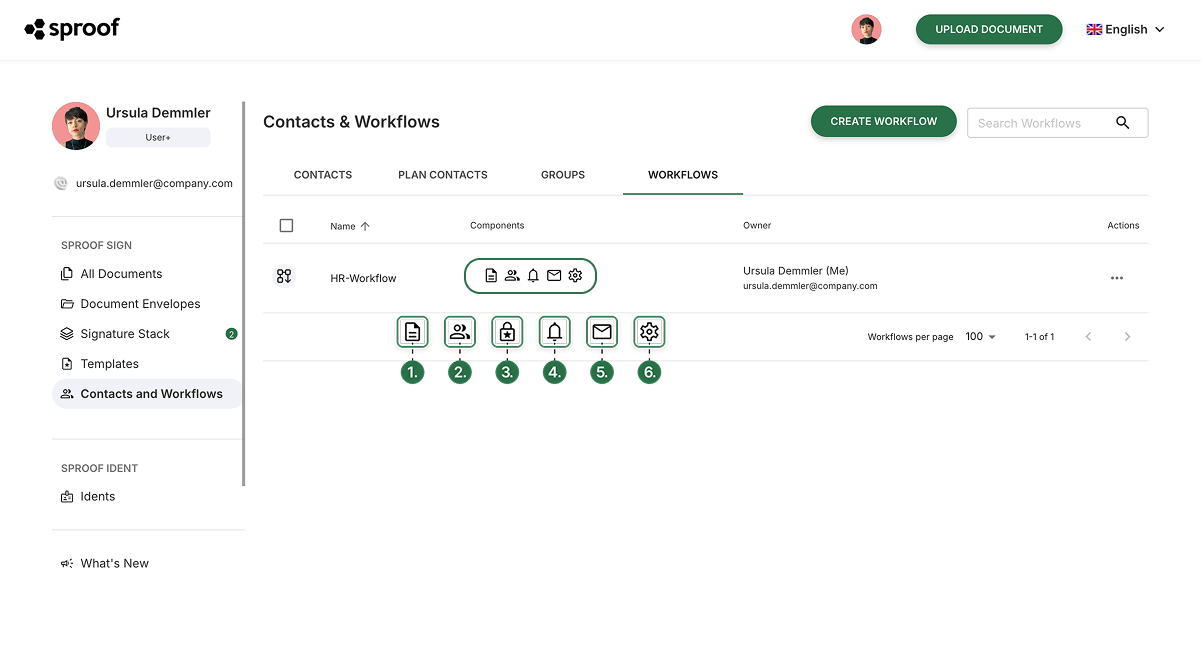
You can find workflows in your dashboard under Contacts and Workflows. Then navigate to the third tab Workflows. There you will find all workflows listed. Multiple icons are shown in the "Components" column. These represent the settings you have configured for the respective workflow.
You can save the following parameters in a workflow:
-
Document(s), document folders, document placeholders and signature/form fields
-
Recipients (specific people and recipient placeholders)
-
Order of signatures
-
Setting that only one person from a signing round needs to sign
-
Roles of individual recipients (signer, viewer, approver)
-
-
Required signature type (FES, QES)
-
Automatic reminders and due date
-
Invitation message
-
Additional settings (e.g., permission to forward, invitation language, etc.)
2. Save signature process as a workflow
You can go through the process of collecting signatures as usual. After sending the invitation you will be asked if you want to save your process steps as a workflow. Proceed as follows:
-
Click the "Save as workflow" button.
-
Give your workflow a unique name.
-
Select the parameters you want to save for your workflow.
-
Click "Save workflow".
3. Create a new workflow
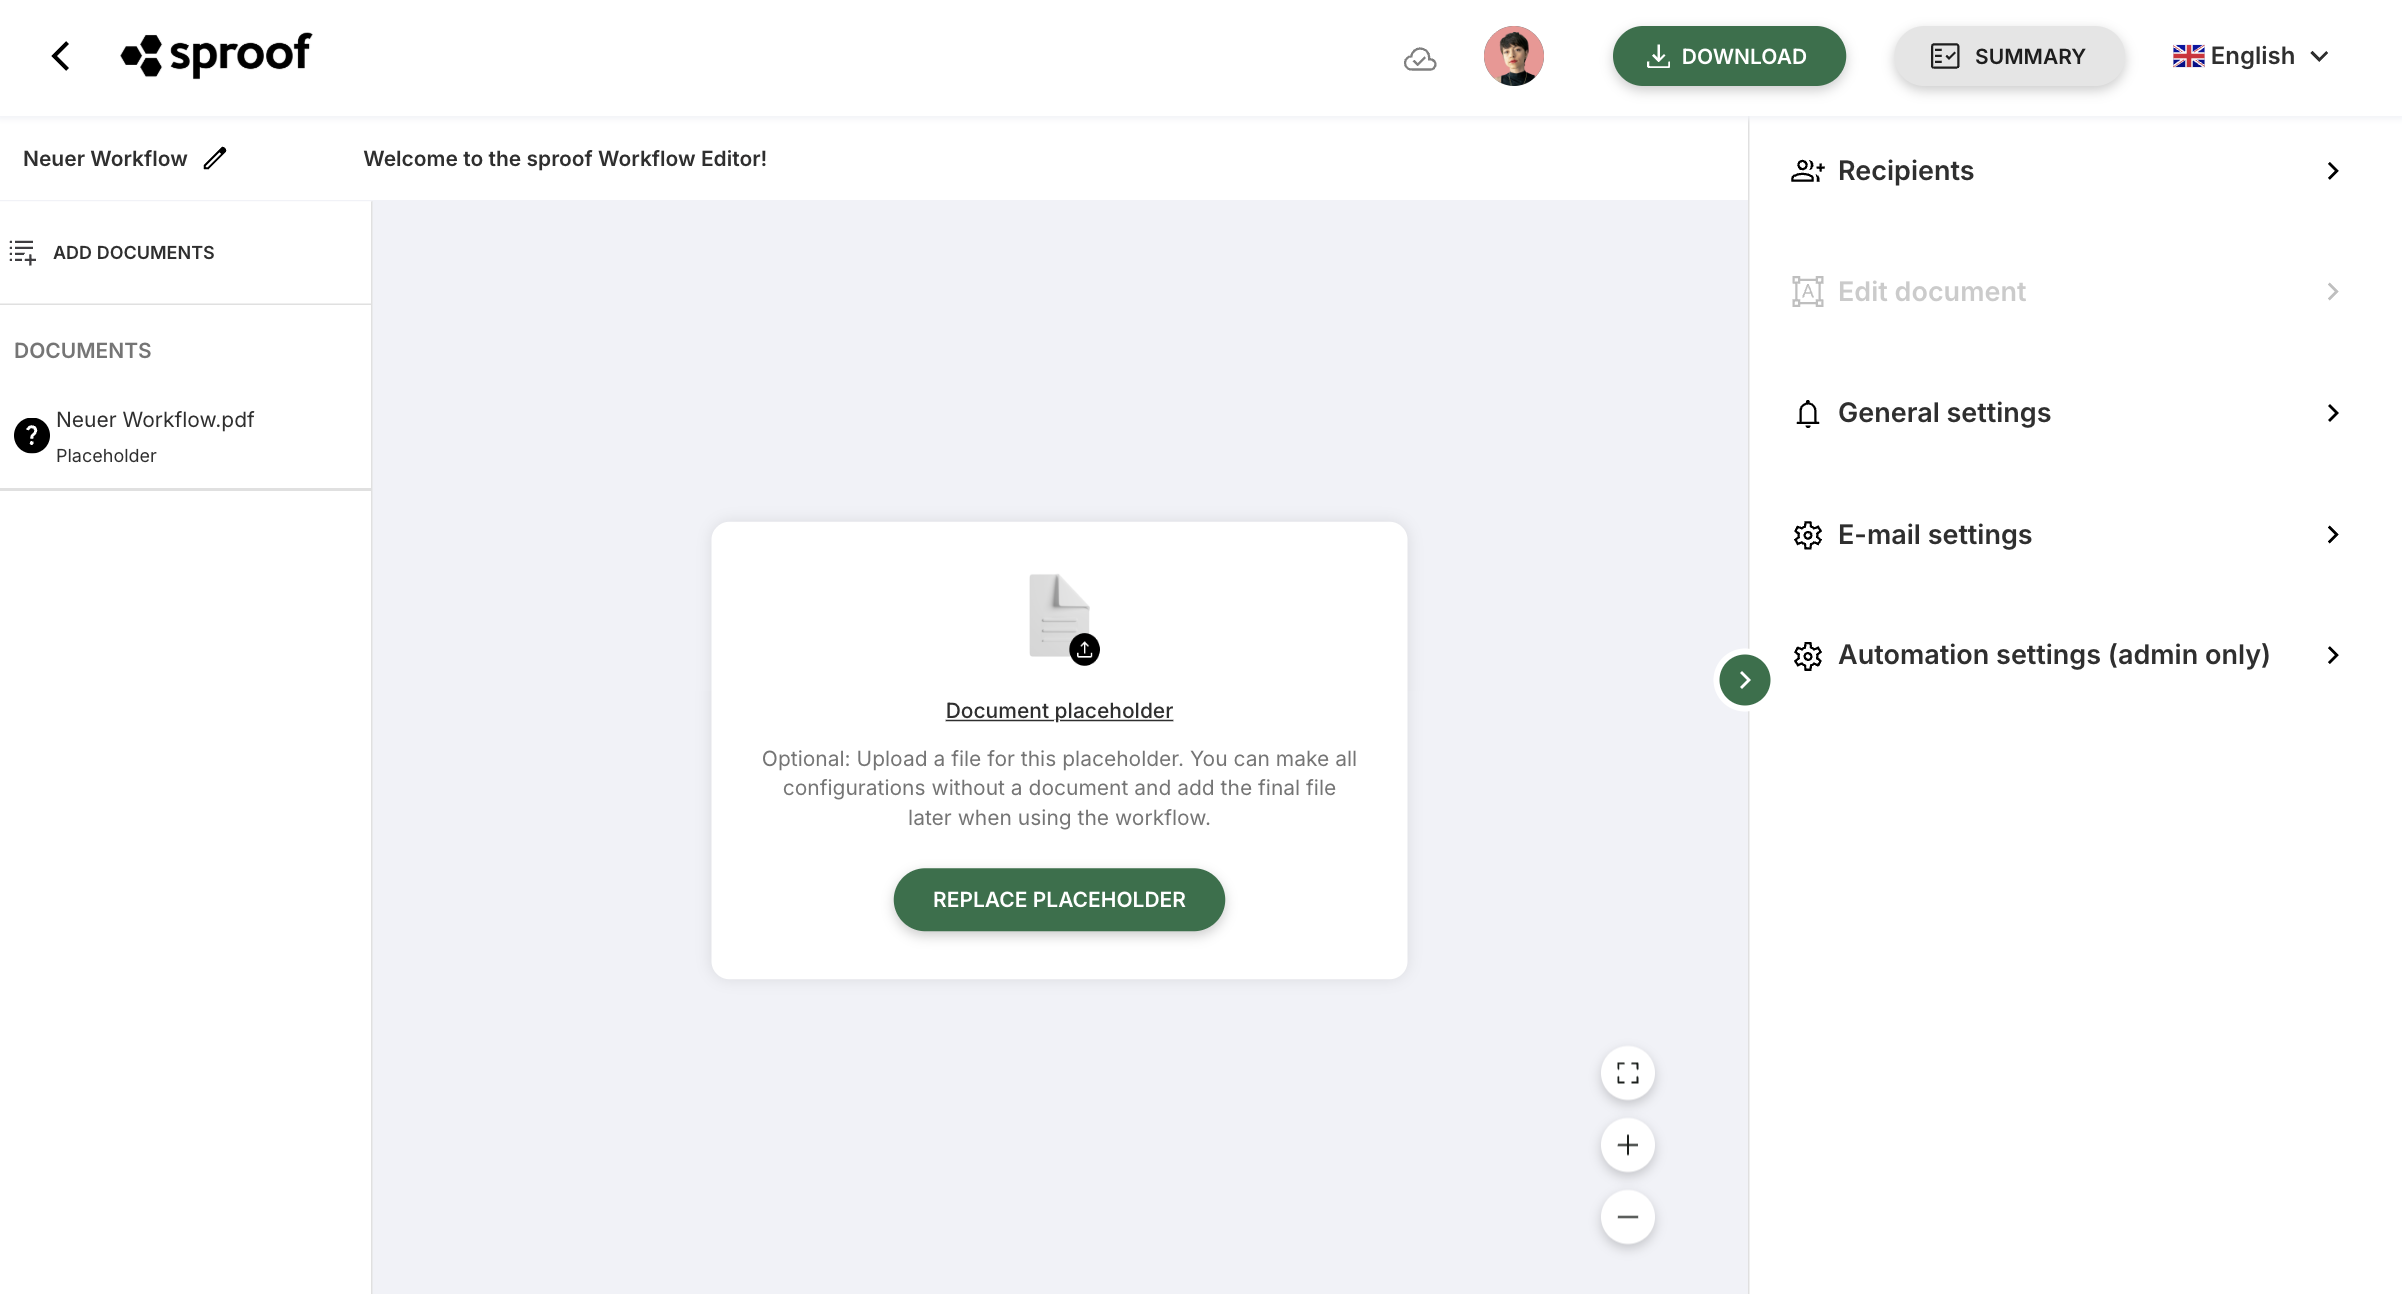
With the smart workflow editor you can create a workflow without having to upload a document beforehand. To do this, open the Dashboard section Contacts & Workflows > Workflows and click "Create workflow". The workflow editor will then open and works as follows:
-
Name the workflow: Give your workflow a unique name at the top left.
-
Structure & sidebar: The editor follows the familiar logic but starts without a document. The menu items in the sidebar are partially adapted.
-
Add document (optional): A workflow can also be saved without a document. Functions like form fields, however, are only available with an uploaded document. Click "Add document to workflow" to do so.
4. Example setup of a workflow
-
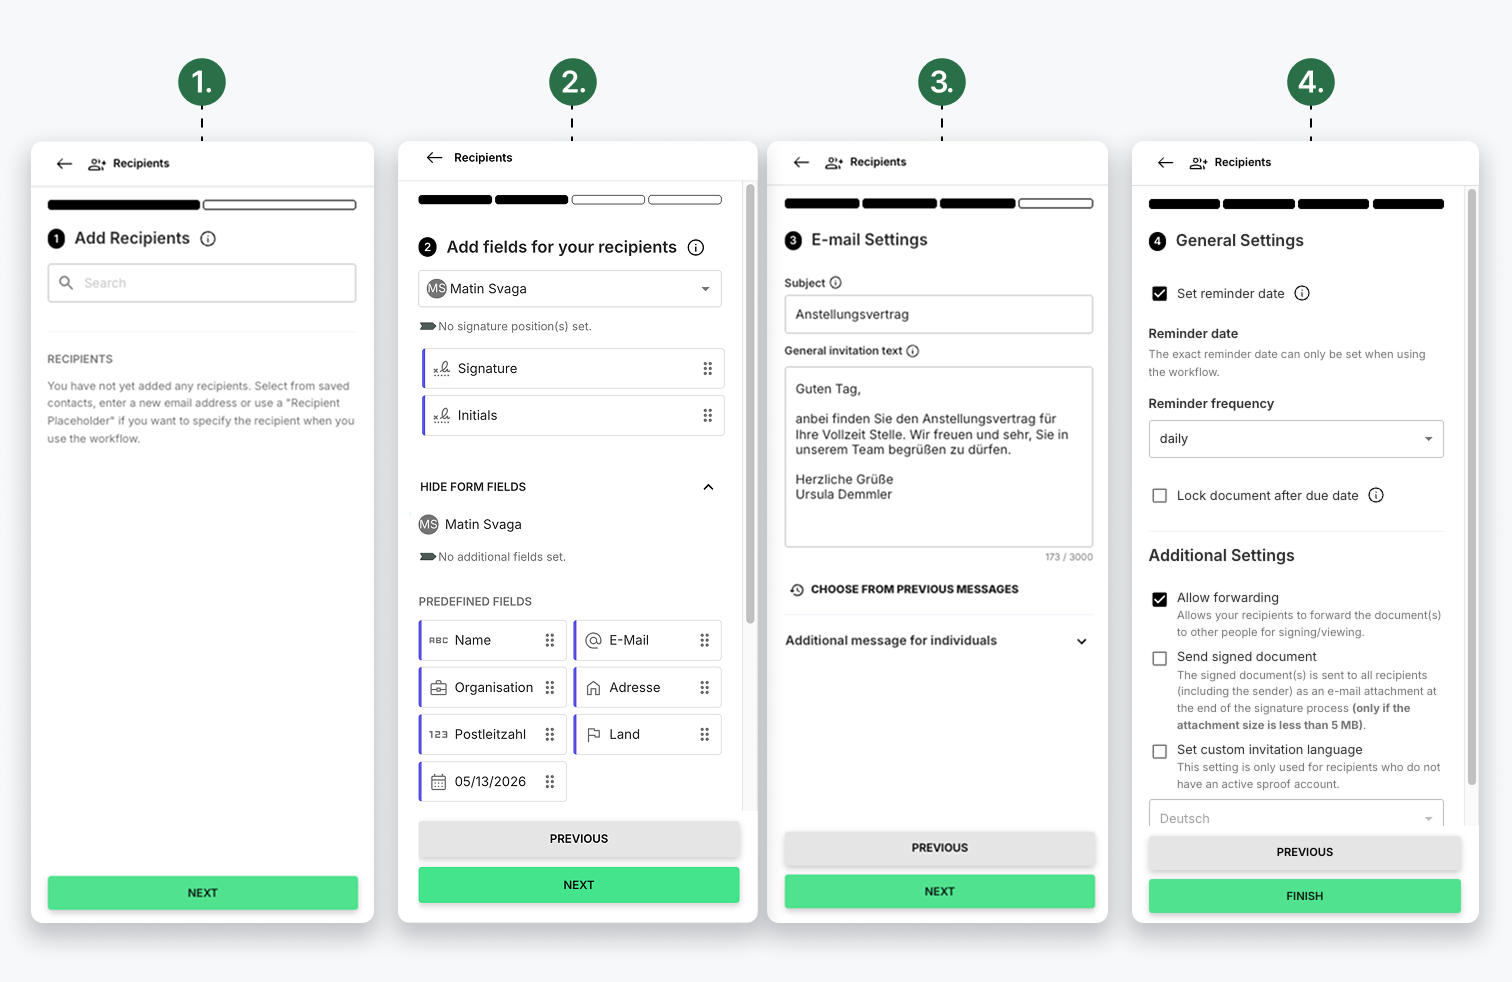
Add recipients: Add people, set order and roles, place signature and form fields. Optionally configure reminders, due date and invitation text directly.
-
Edit document: Prepare the document and insert form fields or read-only text. Details in the Academy module Prepare Forms
-
Reminders & due dates: Shortcut to the deadline and reminder options. Only necessary if not already defined in the recipients step.
-
Invitation settings: Shortcut to language, email text and forwarding options, also only relevant if not set in the previous step.
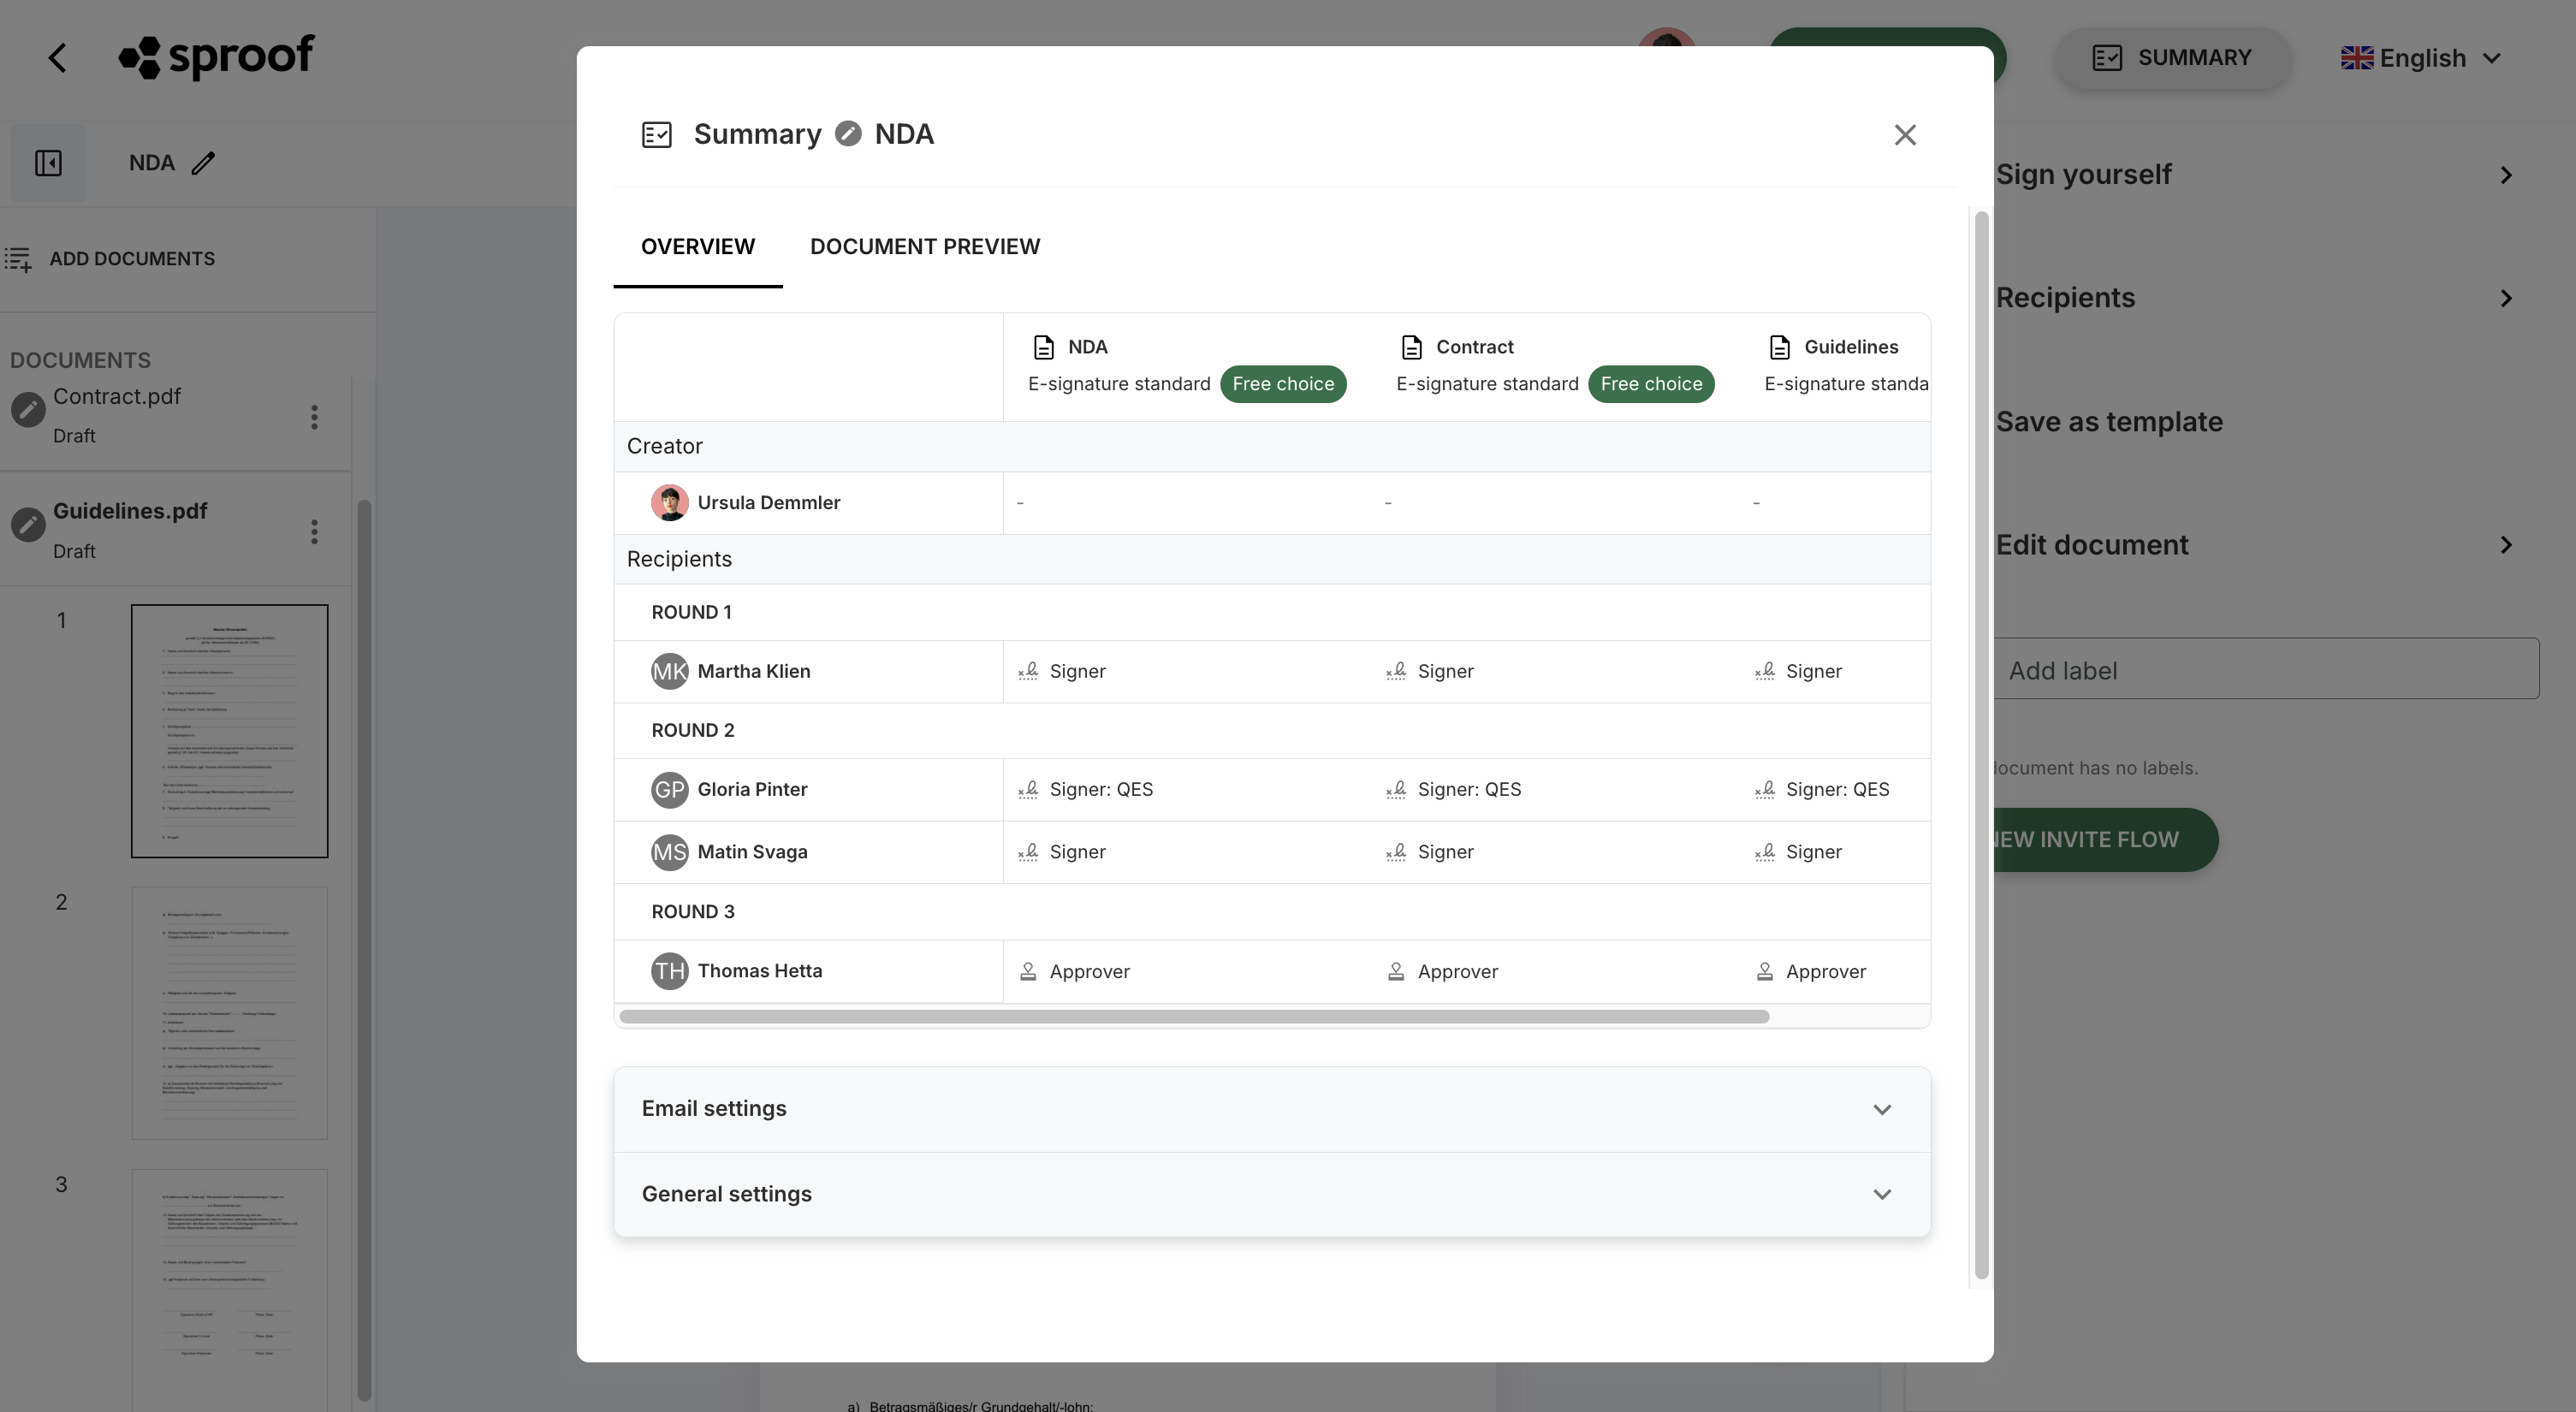
By clicking the "Summary" button at the top right you can open an overview at any time showing all details of your configuration (roles, document visibility, global and individual e-signature standards, email settings, general settings).
5. Special feature: the recipient placeholder
Recipient placeholders represent recipients whose identity is only determined when the workflow is used. This allows you to prepare all roles, fields and settings in advance — even if the specific people are not yet known.
-
Typical use cases:
-
The specific person is not yet determined when creating the workflow.
-
Different people regularly take on the same role.
-
-
Example: An employment contract should always be signed by management and the employee — the specific names are assigned later.
-
How it works:
-
You will find recipient placeholders at the top of the list when adding contacts.
-
They behave like regular contacts and appear in the recipient list.
-
Name placeholders clearly (e.g., "Employee", "Management") — this helps you keep track when assigning them later in the workflow.
-
6. Workflows with document folders & placeholders (New)
With this new feature you can now bundle multiple documents in a workflow. In addition, placeholders can be used if it is not yet clear which specific documents will be used later when creating the workflow. This keeps your workflows more flexible and easier to prepare.
-
Document folders in the workflow: In the workflow editor you can upload multiple documents instead of a single document and arrange them as a folder. All settings such as recipients, form fields and order then apply to the entire folder.
-
Use document placeholders: If you create a recurring process (e.g., onboarding) as a workflow, but the specific document (e.g., the individual employment contract) differs each time, use a document placeholder.
-
In the workflow editor click either "Replace placeholder" directly or "Add documents" and then "Add document placeholder".
-
Configure the workflow as usual with recipients and settings.
-
When you use the workflow later, you will be prompted to upload the specific document for the placeholder.
-
7. Using workflows
You have several options to start a workflow. The first way is via the Dashboard under Contacts and Workflows > Workflows:
-
Option 1: Click a list entry to open the detail view, then click "Use workflow".
-
Option 2: Click the 3-dot icon in the list entry and choose "Use workflow".
-
Option 3 (in the editor): Open or upload a document, go to Recipients and select "Choose from contacts and workflows" in the search field. Add the desired workflow.
When you use a workflow, a new document entry is always created while the workflow itself remains unchanged. All settings are applied but can still be adjusted for the current run.
8. Assign placeholders (people & documents)
-
Recipient placeholders: Go to the "Recipients" tab. A dialog will prompt you to select a real person for the placeholder. Repeat this for all placeholders.
-
Document placeholders:
-
Starting the workflow via the dashboard: If your workflow contains a document placeholder, you will be prompted to upload the document applicable for this run after starting the workflow.
-
Starting the workflow via the editor: If you use a workflow through the editor, the current settings of the invite workflow will be overwritten.
-
9. Update workflows
-
Edit in the editor: In the dashboard, choose "Edit workflow" via the detail view or the 3-dot menu. The workflow editor will open and you can change the desired parameters. Finally click "Save workflow".
10. Share workflows
Previously you could either share workflows with the entire plan or not at all. From now on you have full control:
You can now specifically share workflows with individual people or internal groups.
Please note that sharing workflows is only possible within your plan (internal). So if you want to share a workflow with a group, make sure the group is a "Plan Members" group and consists only of plan members. More on creating groups can be found in the module Manage Contacts & Groups
How to do it:
-
In the workflow detail view click the share icon.
-
A window opens: Here you can either use a toggle to share the workflow with the entire plan or use the search field to select individual people and groups.
-
Confirm with "Share workflow".
How do I recognize shared workflows? A green share icon next to the workflow name immediately shows you that this workflow has been shared with others. Want to change the settings? Just click the icon again, either directly next to the name or in the detail view.